This article contains affiliate links
Inhaltsverzeichnis
- Why QNAP NAS hardening is important
- Youtube video tutorial (QNAP NAS hardening)
- Tutorial: QNAP NAS hardening
- Step 1: Deactivate unused services
- Step 2: Uninstall unused apps
- Step 3: Use generated passwords
- Step 4: Deactivate the admin account
- Step 5: Use 2FA (Use NTP!!!!)
- Step 6: Connect to your NAS via SSL
- Step 7: Always use the newest Firmware version
- Step 8: Keep the malware remover up to date
- Step 9: Change the standard Ports
- Step 10: Enable Network Access Protection
- Step 11: Do not use myqnapCloud service
- Step 12: Put a firewall between the NAS and the internet
- Step 13: Enable System Connection Logs
- Step 14: Use VPN for a remote connection
- Links
Why QNAP NAS hardening is important
A NAS is a beautiful place for important data and backups. This makes it attractive for hackers. In the past Synology and Qnap have been attacked with ransomware:
This is why we do QNAP NAS hardening 🙂
Youtube video tutorial (QNAP NAS hardening)
Please accept YouTube cookies to play this video. By accepting you will be accessing content from YouTube, a service provided by an external third party.
If you accept this notice, your choice will be saved and the page will refresh.
Tutorial: QNAP NAS hardening


Step 1: Deactivate unused services
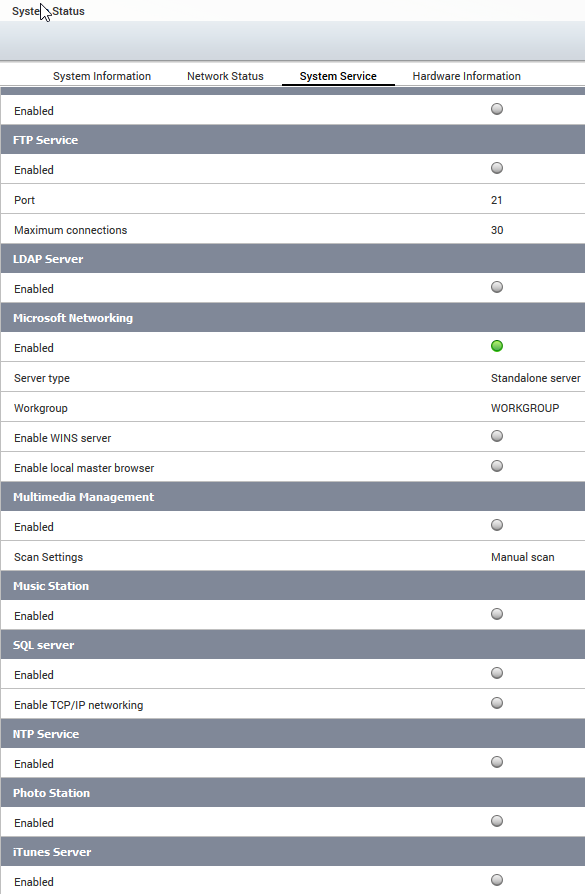
In the first step we decrease the attack surface of our NAS by deactivating unused services. This can be done by accessing the „control panel“ and by navigating to “system status”. Now select “system services” to get an overview about all active services. Now you can go through the list and deactivate unused services.
Step 2: Uninstall unused apps
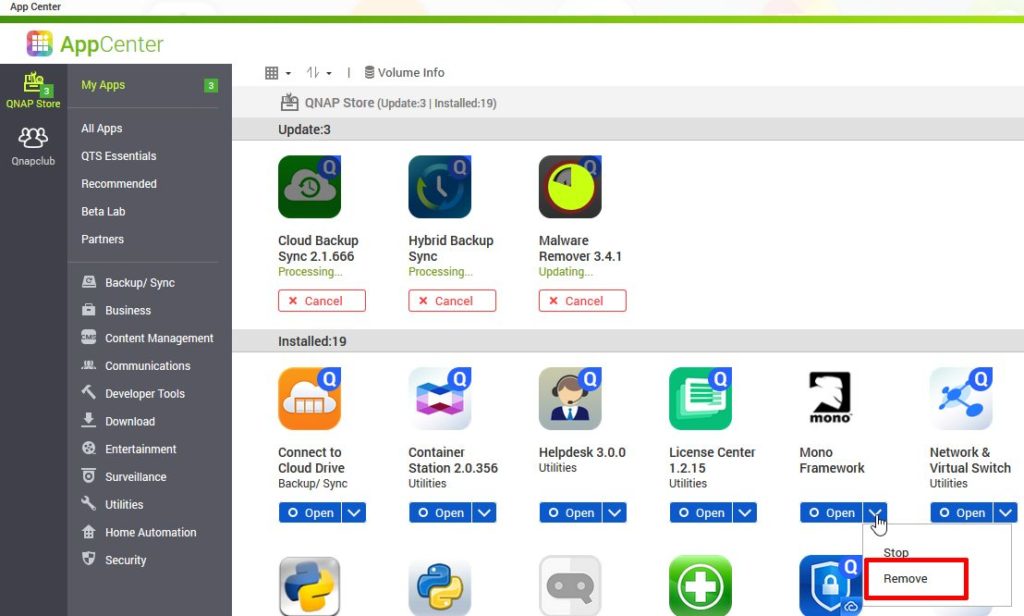
The preinstalled apps are another attack surface. You should go through them and uninstall the ones you do not use. This can be achieved by opening the app center.
Step 3: Use generated passwords
The latest attack on qnap devices could succeed because users used weak passwords for the administrator account. Make sure, your password is generated by your password manager.

Step 4: Deactivate the admin account
Another recommendation is to deactivate the admin account and create a copy of it with a complicated and not easy to guess user name. To do so, go to the user management and create a new user. Add this user to the administrator’s group and give it sufficient permissions to access the network shares and all applications. Try to log-on with this user and deactivate the admin account with this new admin user.
Step 5: Use 2FA (Use NTP!!!!)
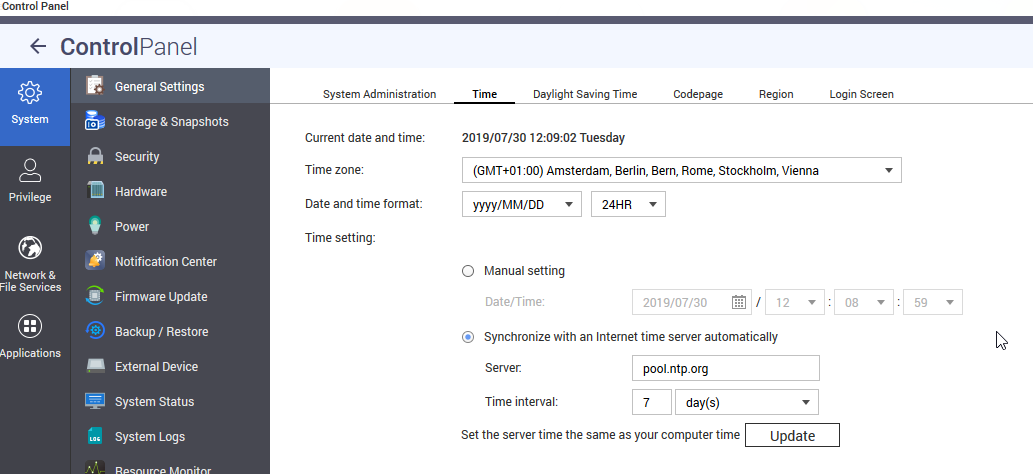
QNAP offers 2 factor authentication (2FA) for the login. Before you can activate it, you must make sure that the time settings are correct and NTP should be enabled. The NTP option can be found in the control panel, system and then general settings. At the top you can now change to the time option and make sure that NTP is activated and the NTP server is reachable. Now you are prepared for the 2 factor authentication. In the following steps you will get a secret which is meant for the google authenticator or any other app who can deal with TOTP codes. Make sure to backup this secret. I will only show the steps performed on the NAS: Click on your username and got to options. Jump to 2 step verification. Click on get started. Scan the QR code with your google authenticator app. In the next step you have to enter the code which has been generated on your mobile phone.

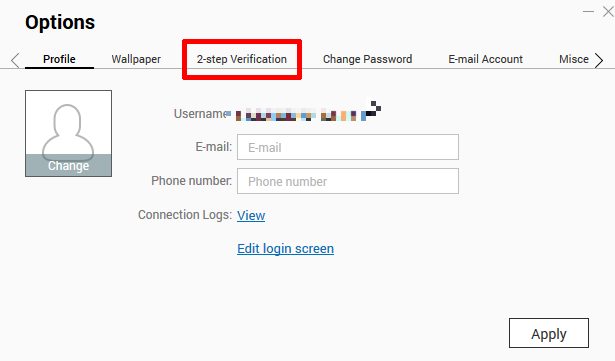
The next step asks you for a security question or a mail address. In my opinion this renders the second factor useless but you can still give a wrong answer to the question and secure it safely in your password manager.
Step 6: Connect to your NAS via SSL
To make it harder for sniffers in the network, make sure that SSL is activated and make also sure that you are using it in your browser for login. To do so, enter https before your NAS IP in the browser, and append the SSL port to the address. You will get an error because your certificate is self-signed. Just ignore it.
Step 7: Always use the newest Firmware version
The next hint looks obvious but on reddit I could see users complaining about the malware attack on their NAS which used a really old firmware version. Your NAS will inform you about new firmware versions and asks you to update. Despite several glitches in the last year and a lot of revoked firmwares, for security reasons you have to be up to date to be protected against threats. If you do not get firmware updates for your device because the end of support is reached, you should not open up any ports to the internet and only operate it in a secure environment which is firewall protected.
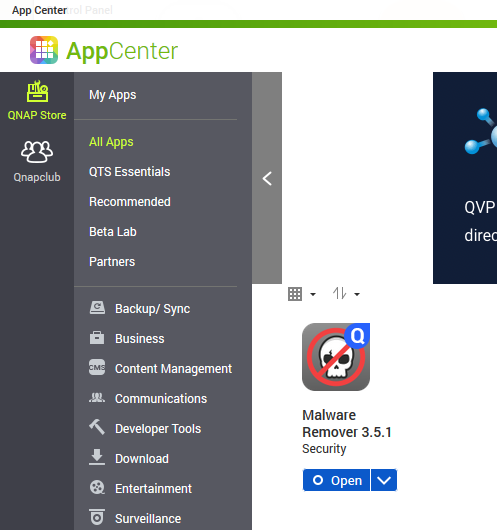
Step 8: Keep the malware remover up to date
QNAP offers an anti-virus solution. I do not have too much trust in it but nevertheless it is also a good idea to keep it up to date. The name of the app is malware remover and you can update it in the app center. By the way: You should always keep all installed apps up to date to make sure that you are not at risk against known security issues in these applications.
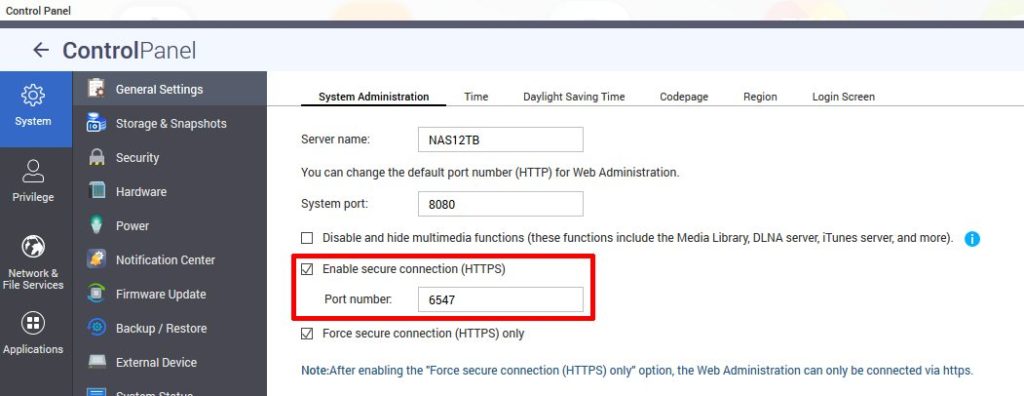
Step 9: Change the standard Ports
If your NAS is running services – which are opened to the internet – you can add a layer of obfuscation by not using the standard ports. In the example I change to port for the HTTPS connection. This trick applies to all other services which run on standard ports.
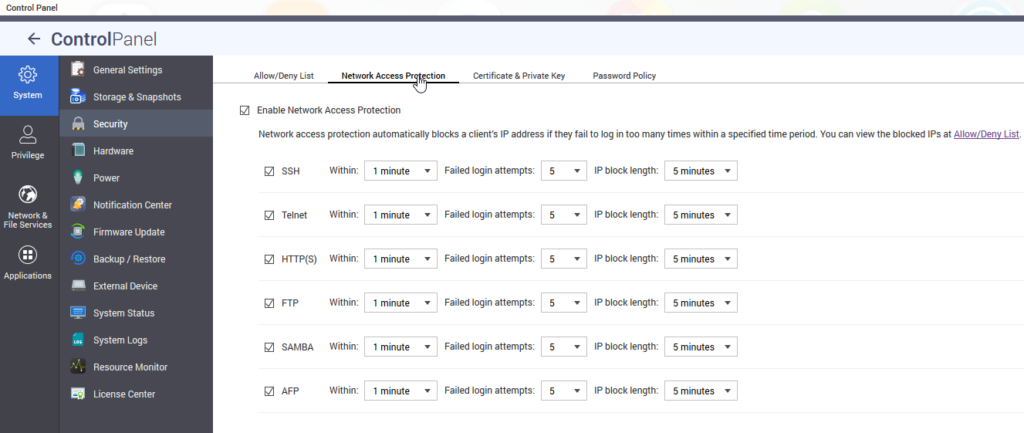
Step 10: Enable Network Access Protection
QNAP offers Network Access Protection to be save against brute force attacks. To activate it, go to control panel, security and then to network access protection.
Step 11: Do not use myqnapCloud service
The next hint is not to use my-qnap-cloud service. In my opinion QNAP is not trustworthy when it comes to security and my-qnap-cloud is like a honeypot for attackers. But this is just my personal opinion.
Step 12: Put a firewall between the NAS and the internet
The next thing may look obvious but it should not be missed: put a firewall between your NAS device and the internet. In my case it’s a simple router.
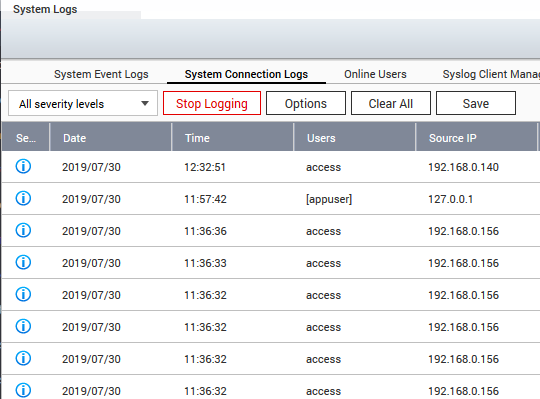
Step 13: Enable System Connection Logs
In the control panel you will find system logs. You should have the connection logs activated to make sure that you can trace attackers. If the connection logs are disabled, you are blind in case of an attack.
Step 14: Use VPN for a remote connection
If you want to access you NAS from the internet and not only from the local network- you should think twice before you open up a port in your firewall. I decided to access my NAS via the integrated (Q)VPN server. This makes it possible to get access to all NAS services by only opening a single port. This may help to decrease the attack surface.
Links
How to make your Turbo NAS more secure?
https://www.reddit.com/r/qnap/comments/c2worz/sustained_intrusion_attempt_and_why_good_qnap/
https://www.qnap.com/en/how-to/faq/article/how-to-make-your-turbo-nas-more-secure/
https://www.broadbandbuyer.com/features/3915-top-tips-to-make-your-qnap-nas-more-secure/
QNAP Security issues:
https://blog.securityevaluators.com/multiple-vulnerabilities-discovered-in-qnap-nass-303b720d487b
https://seclists.org/fulldisclosure/2017/Feb/35
https://www.qnap.com/en-uk/security-advisory
QNAP End of support list:
https://www.qnap.com/en/product/eol.php
The motivation for this article:
New eCh0raix Ransomware Brute-Forces QNAP NAS Devices